Better photos in 3….2…1!
For as long as I remember, I have always loved photos. However, I’ll be honest, my photos have mostly been just another average Utah Girls photo collection. Thankfully, this class has taught me some great life lessons and skills! Truly, great photos can be taken by each of us! Three principles I have learned in my visual media course that have helped train my eye for better photos include 3 simple tips that, if used, have helped me gain a greater appreciation for the art of photography! Other than the photos I took myself, I found all of my photo examples from pexels.com.
Rule of Thirds
The Rule of thirds states that if you should separate an image into nine points. You should then do your very best to place your focus in your photo on the intersections or along the lines of your ‘thirds’. This creates a balance within the photo. Below is an image found on Pexel.com of which I think is a great example of the rule of thirds. Go ahead, look at the image. Where does your eye naturally go first? Was it the camera? Me too.
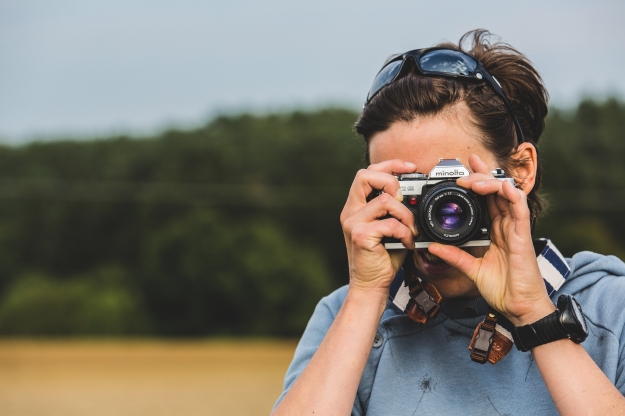
Pexels.com
The person is set right along the right hand line. The main camera, which is the focal point of the image, is drawn right at the intersection of the image making it easy and clear for the viewer to recognize what the photographer was focusing on. Your eye naturally is drawn to the image and the rule of thirds adds emphasis in the drawing. This is all apart of the rule of thirds!

I decided to try out the principle of thirds on my nephew, Connor. In the first image, he is centered. The photo is nice, but watch this!(Scroll to 2nd photo) When I applied the principle of thirds (as seen in image two) voala! The image is a lot more balanced and helps focus the eye right at Connor. It also complemented the natural background around him. Before using the rule of thirds, you could see the background, but not as much. Now, using the rule of thirds, you can not only see the background, but it complements the focal point.


Leading Lines
This is one of my favorite principles that I have learned so far. One reason I love photos is because they help tell or create a story in our minds. You can get to know someone very quickly by looking through their pictures. The principle of ‘leading lines’ can do the same: tell a story. Lines entice your eyes right into the picture. What I mean by that is that images that follow this principle are almost asking you to ‘jump in’ and take a journey with them! Don’t’ believe me? Look at the image below.

pexels.com
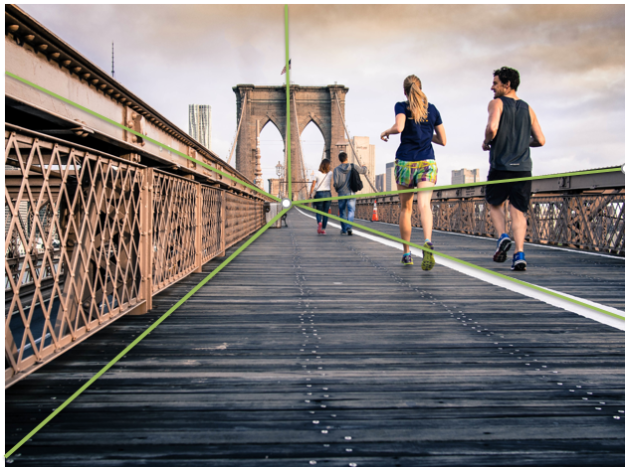
Pexels.com
Notice how the couple is happily running along the path? Just ahead of them, another couple is falling in love walking on the bride. Where are they headed? I don’t know but I sure want to go with them. It seems to be leading to some awesome place if all of those people are moving toward it. The walkway, fencing, down to the nails in the bridge draw our eyes into the picture naturally. The principle of leading lines draw our attention into photos quick and powerfully.


My picture was taken a few months ago when I took Senior pictures for Loryn. The leading lines on the road take you straight from her graduation focus down a beautiful path. This photo, of the many I took that day, has always caught my eye because the lines naturally draws my attention into the photo.
Depth of focus

pexels.com
It has been my experience in life that those I am closest to are those that I take the time to get to know the most. Surface conversation can get old really fast; and those friendships don’t seem to last too long. Same principle applies in photography. When a photo has depth, you are more likely to be drawn into the image. Our minds automatically separate the layers from one another. One type of depth of focus that is increasingly popular is when there is a shallow depth of field. This occurs when your subject is in focus but the background is not. When everything is in focus, this is a deep depth of field. Typically, the depth of focus will have three areas. The foreground, or the main and central focus, the middle ground, and the background. In the picture below, the girl is in a shallow field of focus. The background is a little more blurry and foggy which leads our eyes primarily to the girl contemplating her life. The girl, herself is in the foreground.

pexels.com
My example of depth of focus is a little silly, but it was a project that my husband and I had a good time with. At our house, we love when Buddy our ‘Elf on the Shelf’ comes and visits us each year. That could be a post in and of itself. This is a picture I took for my nieces and nephews showing that I ‘caught Buddy on camera eating our candy!’ Anyway! Back to depth of focus. Buddy is the main focus. He is in the foreground. The middle ground of the photo is the present and the blue ornament. The Background is our lovely living room. Depth can help us get a feel for our surrounds and what the ‘atmosphere’ of the photo is.


That’s a Wrap!
There you have it. Three simple and easy tips to help increase your ability and techniques in photography. I am excited to start implementing these tips into my own photos as well. Don’t rush yourself when taking a shot. Take your time. Ask yourself, where is my subject placed (rule of thirds), is there any lines I could use to draw my viewers in? (leading lines), and where is my focus (depth of focus). You got this! Now go for it!
